


Note, this is for acoustic guitar. Part 2 of the acoustic tutorial is coming soon!
Have you ever wanted to play guitar? If so, this guide is for you. It is a simple tutorial that helps you learn the basics of guitar.
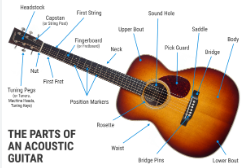
First, sit upright with the guitar sitting on your lap on its side so that the hole is facing away from you and that the long part is going to the left. Note that there are six strings; if you count down from the top, they are E, A, D, G, B, and High E. The E is the closest to you. A simple trick to remember this is “Elephants And Donkeys Grow Big Ears”. Next, you will see the long part of the guitar. This is called the neck. At the end of it, you will see a piece of wood with bolts that you can turn. This is called the headstock. You use it to tune your guitar.. Now, pluck the first string, or the E. Usually, pluck the strings near the circle at the bottom of the guitar. This part is called the body. Just plucking a string without anything else is called an open note. For example, just playing A is called an Open A, or just a G is an Open G. Now, practice plucking each string individually. Now that you are done with that, it is time to move on.
Now, to start playing music, look at the neck. You will see bars that separate the neck into 19-24 parts. These are called fretbars. Put your pointer finger on the first fret of the E, which comes right after the headstock. It is highly recommended that when playing on an acoustic, you should put your finger just behind the next fretbar. Make sure your thumb is wrapped around the bottom of the neck so it is right behind your pointer finger. Now, with your other hand, pluck the first string. The sound should come out different from just plucking an E open. Keep practicing until you get that perfect sound. To make different sounds, you put your fingers on different frets and different strings. Now try playing an open E and then a first fret E, then repeat. Now you have learned your first notes. If you don’t understand something, comment it on this article and I’ll teach you how to do it in my second tutorial.


Gabrielius Stanevicius • May 2, 2025 at 11:14 am
If you don’t understand something in my tutorial, you can comment here, and I will answer your questions in my second tutorial!